
Go ahead and buy Christmas Cards for next year. They're on sale now!
Save yourself time next year by attaching return address labels (if you're reasonable sure you won't be moving.) and writing the names of the recipients on the envelopes.
By the time next December rolls around, all you need to do is sign, seal, stamp and address.
Put you box of cards on the top of your Christmas Decorations so it'll be the first thing you see next year.
Showing posts with label Christmas. Show all posts
Showing posts with label Christmas. Show all posts
Wednesday, December 31, 2008
Jump Start next Christmas
Friday, December 12, 2008
Time to Build a little Village
Or at the very least, a house...
I'm so excited to have time, energy and ingredients to build a gingerbread house this weekend.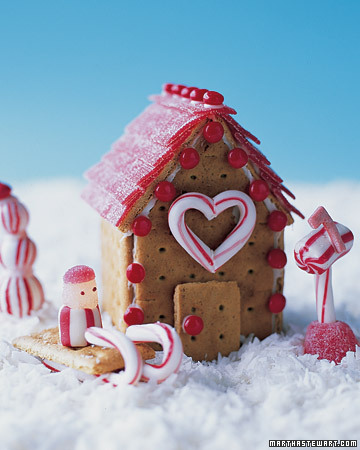
Isn't that marvelous!? I just love the simplicity and cuteness.
As I was double checking what I'll need I thought I'd compile a list in case anyone else is searching.
Here's a photo gallery for inspiration. And here's a step by step guide for building these mini cottages.
A royal icing recipe (so you can stick it all together):
Ingredients
* 1 3/4 cups powdered sugar
* 4 1/2 teaspoons meringue powder*
* 1/4 teaspoon cream of tartar
* 1/4 cup warm water
* 1/2 teaspoon vanilla
Directions
In a large bowl, stir together powdered sugar, meringue powder, and cream of tartar. Add warm water and vanilla. Beat with an electric mixer on low speed until combined. Beat on high speed for 7 to 10 minutes or until mixture is very stiff. Makes about 2-1/2 cups icing.
*Test Kitchen Tip: Meringue powder is a mixture of pasteurized dried egg whites, sugar, and edible gums. Look for it in the baking aisle of your supermarket or at a specialty food store.
In case you need more inspiration, here's another beautiful gallery.
Gingerbread recipe:
Ingredients
* 1 cup shortening
* 1 cup sugar
* 2 teaspoons baking powder
* 2 teaspoons ground ginger
* 1 teaspoon baking soda
* 1 teaspoon ground cinnamon
* 1 teaspoon ground cloves
* 1 cup molasses
* 2 eggs
* 2 tablespoons vinegar
* 5 cups all-purpose flour
* 6 16x12-inch pieces parchment paper
* Purchased canned white frostings
* Assorted purchased candies
Directions
1. In a very large mixing bowl beat shortening with an electric mixer on medium to high speed for 30 seconds. Add the sugar, baking powder, ginger, baking soda, cinnamon, and cloves. Beat until combined, scraping bowl.
2. Beat in molasses, eggs, and vinegar until combined. Beat in as much flour as you can with mixer. Stir in remaining flour. Divide dough in thirds. Cover; chill 3 hours.
3. Cut a 16x12-inch piece parchment paper in half crosswise. Place one of parchment halves on pastry cloth. Sprinkle parchment with flour.
4. Divide each piece of dough in half (you should have six). Place one piece of dough on parchment; roll to 1/8-inch thick. Using 8x5-1/2-inch cutter, cut into shape. Remove scraps; set aside. Lift dough and parchment; place on cookie sheet.
5. Bake in 375 degree F oven 7 to 9 minutes or until edges are browned. Slide cookie and parchment onto rack. Cool. Repeat with remaining dough and parchment, gathering cookie scraps together and rerolling.
6. When cool enough to handle, peel cookies from parchment paper. Decorate using frosting to attach candies. Makes 12 cookies.


Monday, December 31, 2007
Article Published
I've had an article published at ehow.com! Nifty, huh? It's entitled: How to Pack Your Christmas Decorations using Recycled Materials
You can follow this link to read it. http://www.ehow.com/how_2170612_christmas-decorations-using-recycled-materials.html
Lots to share...
Hope everyone had a happy holiday. Ours was relaxing! We got some great goodies. Our kitchen is a little more decked out thanks to a shiny new food processor, cool tools like a lime and lemon juicer, a garlic peeler, and a gorgeous new pan from Emerile's line (thanks mom!).
My birds are also eating in style. At least the little yellow finches are... thanks to a special new feeder just for them. Last night DH and I purchased a bird bath for the back deck. I've been wanting one for ages and I think we've found just the one. It clips to the edge of the deck and has a shallow end, a deep end, and a place to put a dripper. Not to mention the bottom is textured. These are all things that the bird magazine I recently read said a bird bath should have.
I'm so excited!
I've got lots of new "notes to self" and recipes to share.
How was your holiday? What did you get?
Monday, December 10, 2007
Christmas Cards
I used to handmake all my Christmas cards. First I'd design the card, reverse it, copy it onto a linoblock, carve it, ink it up and print each card individually. I hand stamped a special message on the inside and I did this for my mom's cards as well. So each year I'd make two different sets of Christmas cards. At some point, I stopped. Now we're doing store bought cards and it doesn't feel the same, so now I try to put a more personal message in each. Last year we wrote up a "newsletter" and this year we're including a photo.
I think the important thing is not how you make the card or what you include with it, it's the sentiment of the card and what you write. To me, a personal little note is the best!
I've been wandering around the net looking at how others are doing Christmas cards this year. Some seem to be boycotting the idea. Others are embracing it, tailoring it to fit their life and family. I encourage everyone to take a few moments and send a heartfelt sincere card this year. Even one will brighten one person's day. And that's worth the minute or two it takes you to write it.
A Christmas Postcard
Organizing your Christmas Card Writing
Monday, November 12, 2007
A pretty Christmas decoration
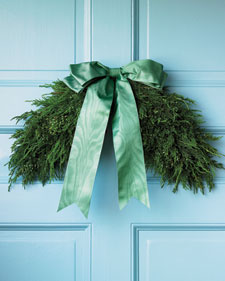
Loved this natural bough of greenery. All you need is a metal coat hanger and a bit of wire. I have a feeling I might do several of these.
Subscribe to:
Comments (Atom)


